4. To collaborate
4.1. To set up workflow
![[Note]](cco-note.svg) | Option |
|---|---|
Please contact your usual NeoDoc contact ( |
4.1.1. Define a template of workflow
![[Caution]](cco-caution.svg) | |
The workflow is organized within a workspace. Everyone involved in the workflow must have a Calenco account. |
For a workspace, the customer account manager can create workflow templates.
From the , click on the menu.
Click on the → :
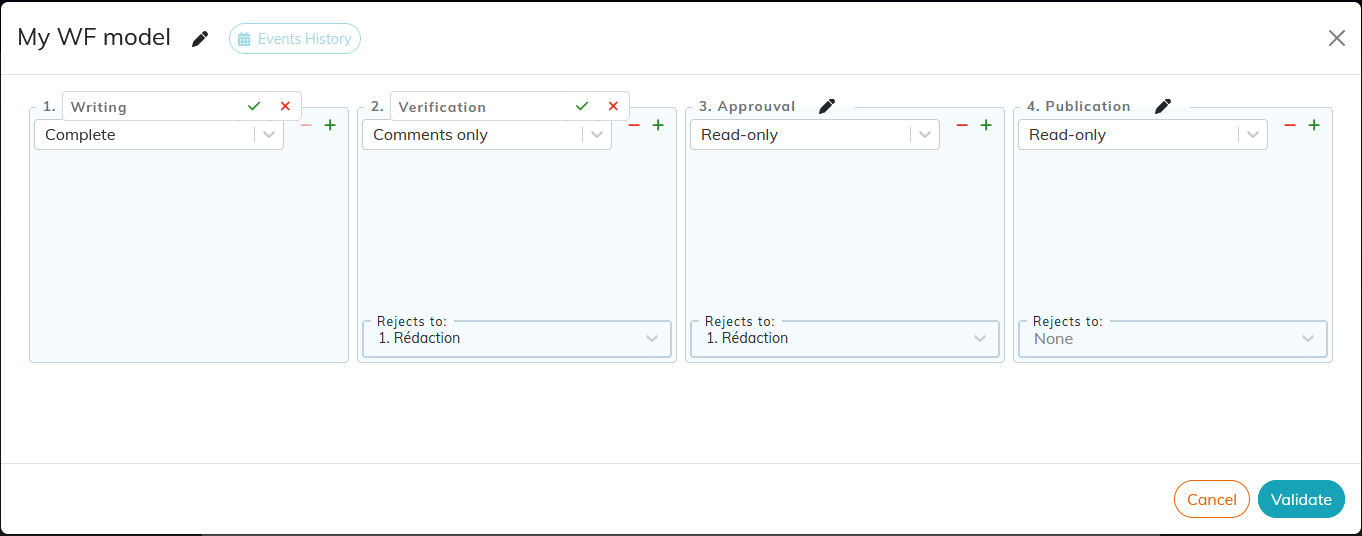
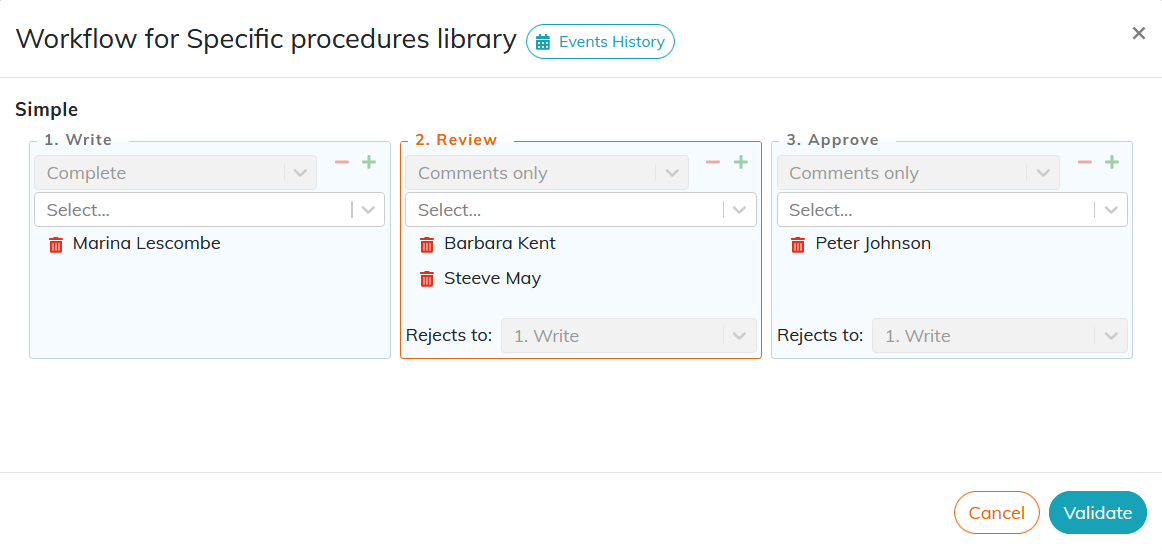
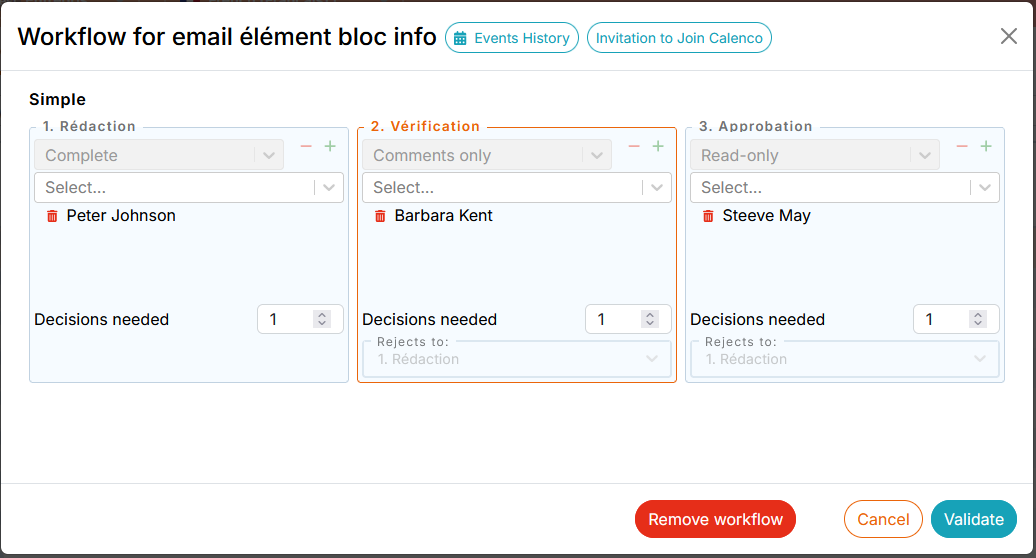
You define:
The name of the model.
the number of steps and their names;
the level of access at each step:
Full write access,
Access with the possibility to comment only,
Read only access,
Access via an online form for operators (see Assign a form via a workflow).
Step to return to in case of rejection of the task.
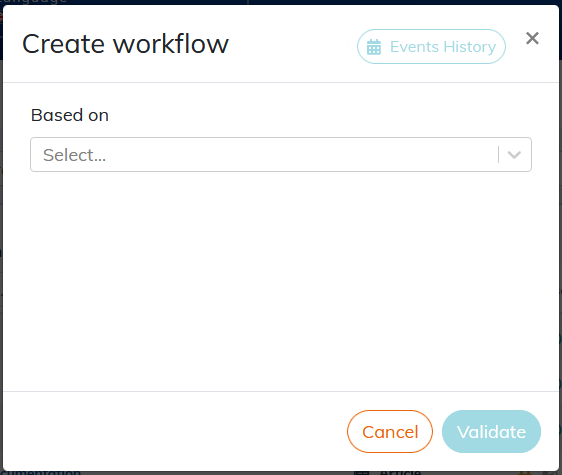
4.1.2. To create the workflow of a document
| |
The workflow is organized within a workspace for each document. All workflow participants must have a Calenco account with access to this space. The customer account manager can invite new person(s) to participate in the workflow directly from the workflow creation and launch window (see Invite new users to the workflow). Workflows are created and managed with the “workspace administrator” role. |
For a document click on the menu → and choose a template.
The template allows you to move quickly when starting a workflow, but you can change all the features.
| |
You can create a document workflow even if there is no custom templates for the workspace. |
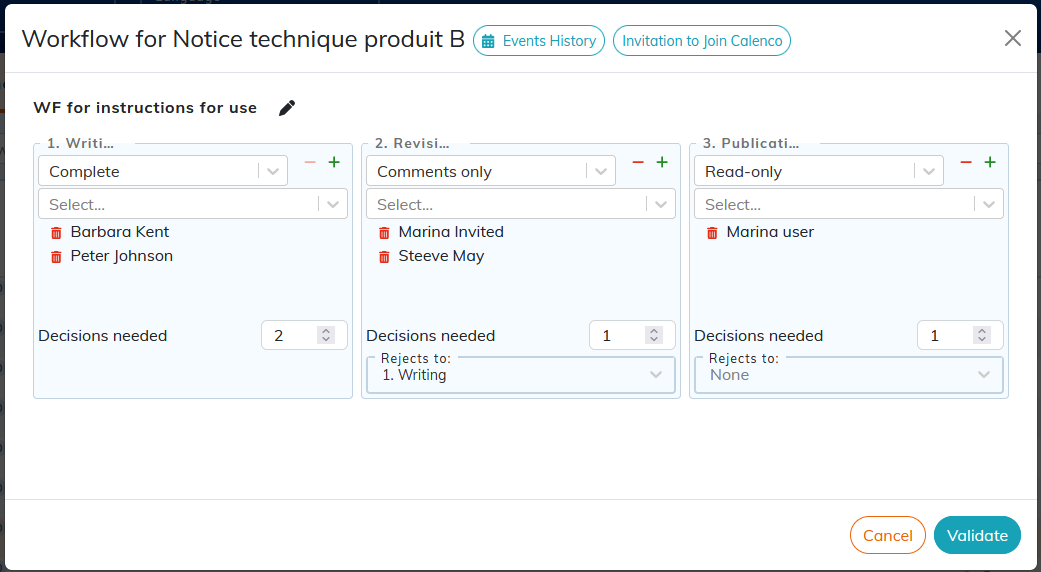
For each step, select:
people who must intervene;
Users assigned to a task receive an email when this task of the workflow is active.
The number of decisions needed to move the workflow to the next step;
Invite new users to the workflow
When launching a workflow or for a workflow in progress, it is possible to invite new users to join Calenco and participate in the workflow.
![[Important]](cco-important.svg) | |
This function is accessible with the “customer account manager” role. |
Click on the menu → .
Click the button at the top of the window.
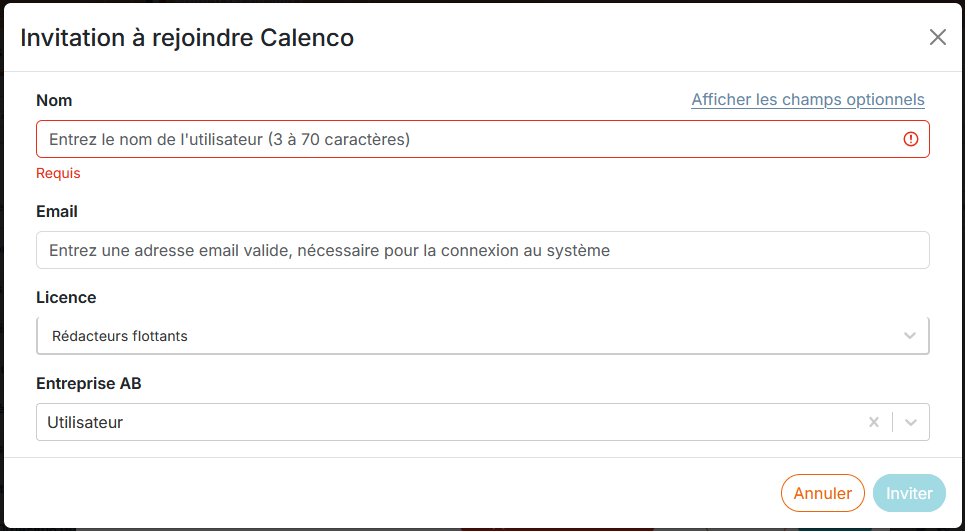
Enter the person's first and last name and email address.
Assign a license and a role for this account (for more information, see Create a new user account).
Confirm with .
Select new user for workflow step(s).
For a user created with the Operator role, remember to associate him/her with interactive form(s) and their corresponding form template(s) by clicking on
 to the right of the role and ticking the necessary tags in the menu.
The invited user receives an invitation email that contains the link (valid for 7 days) to finalize the creation of his/her account by setting the password.
![[Tip]](cco-tip.svg) | |
If the link has expired, the user must go to the login page https://live.calenco.com/ and proceed with the password reset via the “I forgot my password”. |
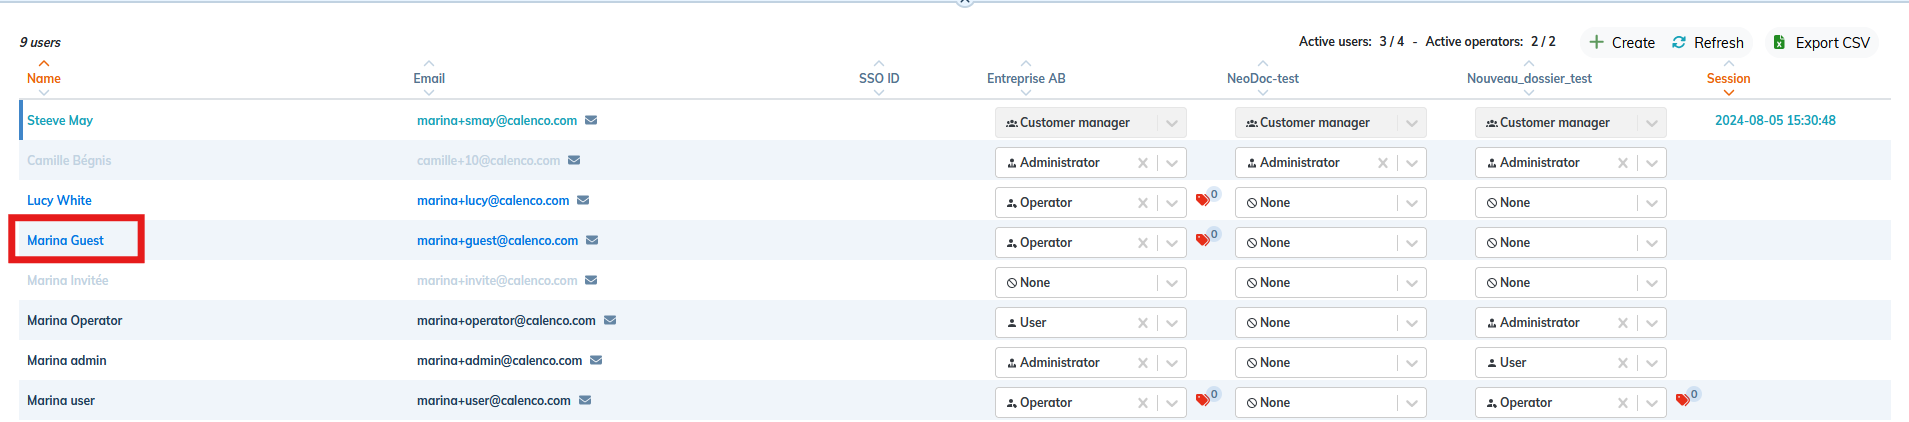
As long as the guest user does not complete the Calenco registration procedure, he or she will be displayed with the bright blue color in the list of users:
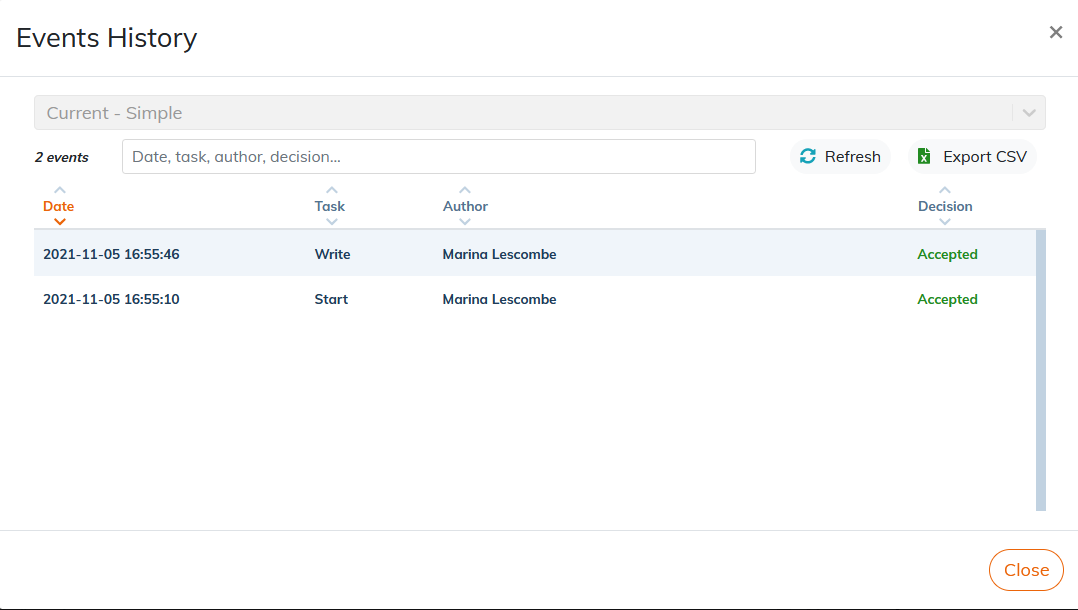
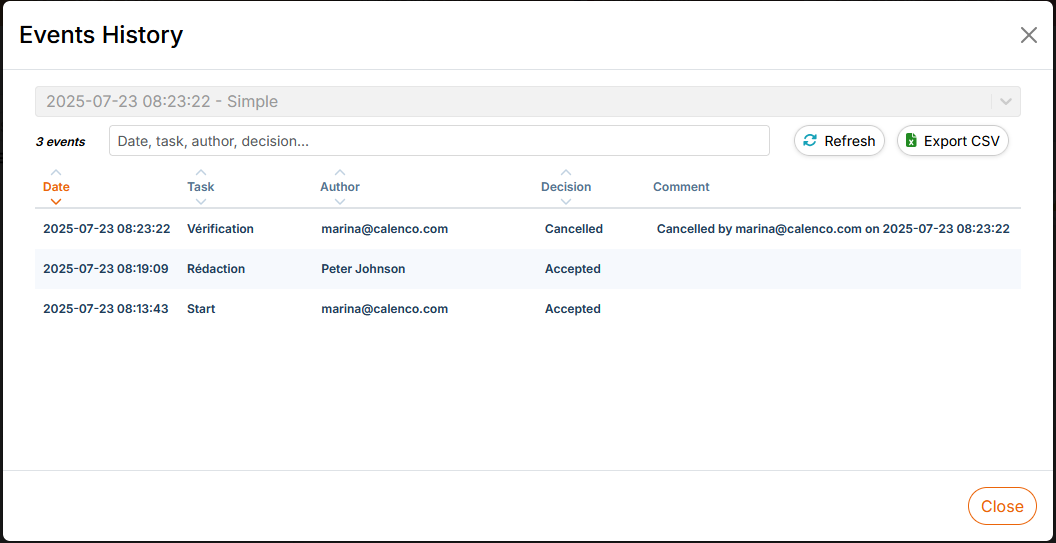
4.1.3. View workflow history
To view the history of workflows associated with a document, use the → menu. Depending on whether or not a workflow is in progress, you will have access to the history via the button:
4.1.4. Modify a workflow in progress
A document is associated with one workflow maximum. When using the menu → of a document, Calenco proposes:
to create a new workflow if there is none in progress;
Interact with the current workflow to:
see the current step,
reassign tasks:
For a task in progress, it is possible to assign one or more users who will receive an email-notification.
It is possible to invite a new user (see Invite new users to the workflow).
It is possible to delete one or more users assigned to a current task without them being notified.
After deleting the assigned users, the workflow goes to the next step provided that all other users assigned to this step have completed their task.
For pending tasks, it is possible to assign or delete one or more users without them being notified by email.
View the history of previous tasks:
4.1.5. Run a workflow task
Users can access their tasks list via the button at the top right:

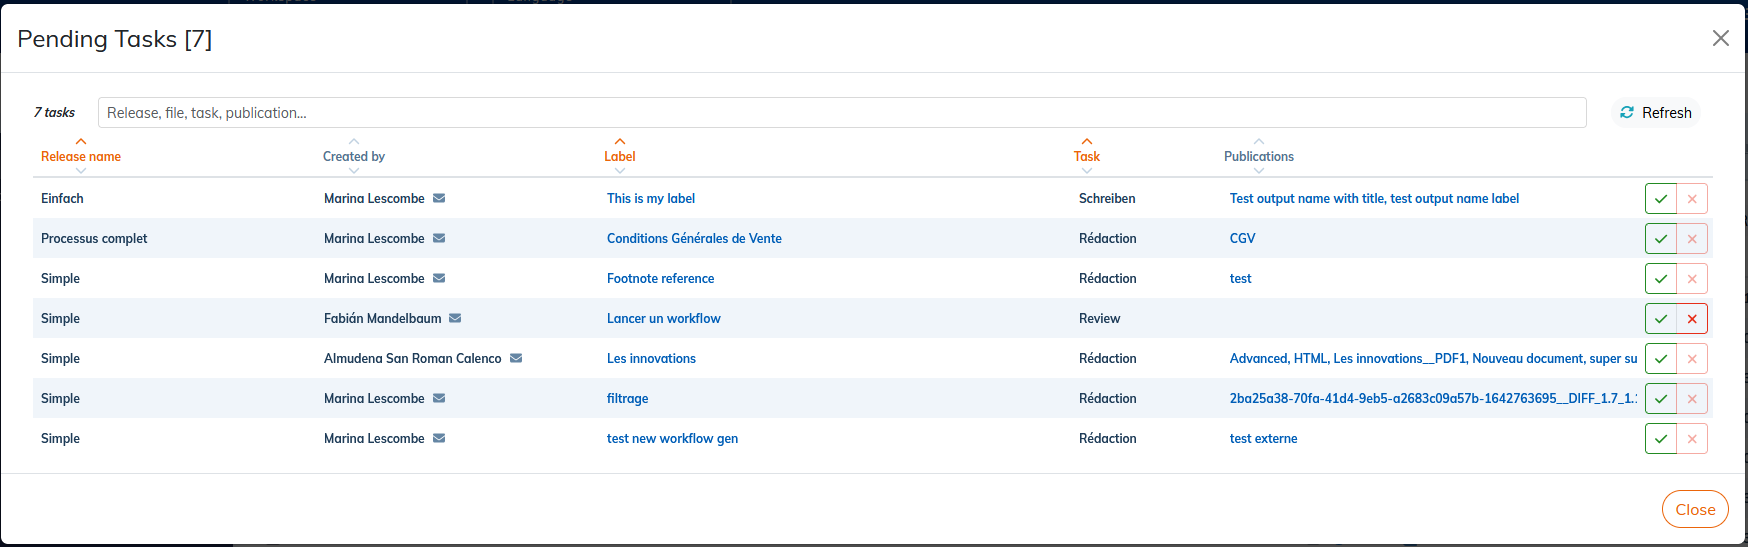
Each row corresponds to a task, associated to the current workspace or not. The following information is available:
workflow name;
person who created the workflow;
label or name of the document allowing access to the editor with the defined access level;
assigned task;
Publications of the document - accessible by clicking;
The green check mark to validate the task after completing it,
The red cross to reject the task after completing it.
When the user rejects the task, the system offers to leave a comment (optional) before confirming its rejection.
The comment is visible in the workflow history or in the “Workflows” tab (see Monitor workflows).
When a task is assigned to several users:
The workflow returns to the chosen task if one of the users rejects it;
The workflow moves to the next step when all users have completed their task (unless the number of decisions defined is less than the number of users assigned to that task).
Affected users are notified by e-mail (see To adapt).
4.1.6. To delete a workflow in progress
| |
This action is accessible with the roles “administrator”, “customer account manager”. |
For a document with the current workflow, click on the menu → .
Click the button and confirm the action.
All the people assigned to the current task receive a cancellation notification by email.
The cancellation event is part of the workflow history:
4.1.7. Monitor workflows
| |
This feature is accessible with the roles “writer”, “administrator”, “customer account manager”. |
The “Workflows” tab contains the dashboard to see all existing workflows in a workspace.
A workflow in progress can be accessed directly by clicking on its name.
The column “Started” contains the date and time when the workflow was started.
The column “Updated” contains the date and time of the last action on one of the tasks, or on the modification of the workflow.
The workflow status is presented as follows  with:
with:
color-code to indicate the percentage of workflow progress;
number of tasks completed / total number of tasks defined for the workflow.
Interpreting the Status of Workflow Steps
Each step is represented by: Step name - number of decisions made / total number of decisions required (number of people assigned to the task (in case the number of people assigned is greater than the number of decisions defined)).
 : not started task.
 : current task.
 : rejected task.
 : completed task.
Interpreting the status of workflow participants
By hovering over each step, the status of the participants(s) appears with their name, email address, and the message of the comment left for a rejected task.
 : user with an action on the task not started or in progress;
 : user who rejected the task.
 : user who accepted the task.
4.2. Sharing between workspaces
This feature allows you to share the contents of a workspace (S: source) with the users of other workspaces (T: targets). Thus, a user who only has access to a workspace T will be able to integrate (via the To reuse function) in its documents with content from the S workspace, but cannot modify the shared content.
![[Warning]](cco-warning.svg) | |
Content shared by the source workspace should not be re-shared by the target workspace to another workspace. This risks causing malfunctions in the system (circular references, loss of visibility of inclusions, loss of data sent for translation). |
| Option |
|---|---|
Please contact your usual NeoDoc contact ( |
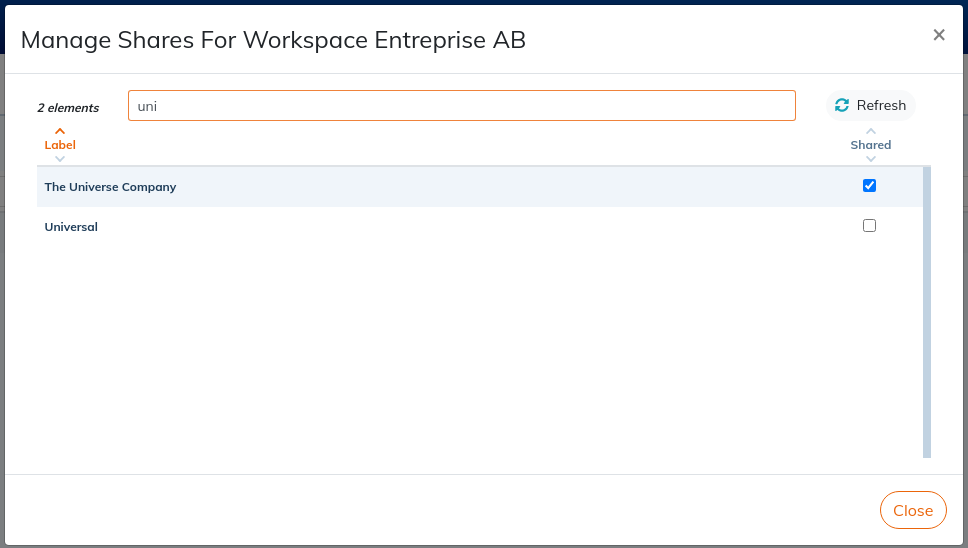
4.2.1. To configure sharing of a workspace
It will first be necessary for the administrator to allow sharing between a source workspace (which contains the contents to be shared) and a target workspace.
From the , click on the menu.
Click on
 Share.
For a target workspace, select one or more source workspace(s).
4.2.2. To share contents
The content to be shared can be:
XML files (document templates, documents);
In the case of sharing fragments of a document, it is necessary to assign a unique identifier to each fragment in order to make it visible in the list of reusable elements.
Images
XSL files (style sheets).
The images used in the style sheet to be shared must also be shared with the target space.
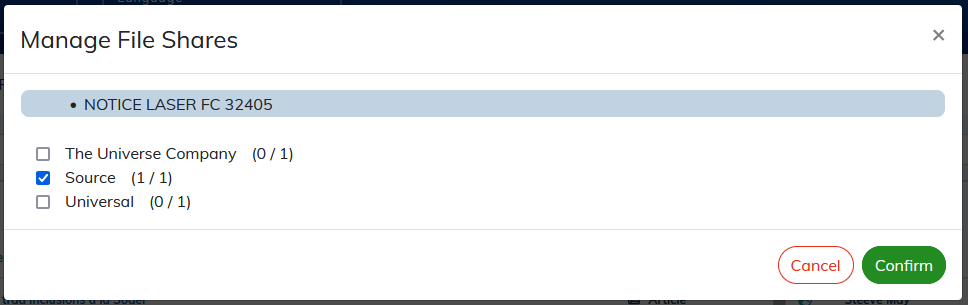
In the source workspace, click on next to a piece of content or at the top of the column when multiple pieces of content are selected.
Click on the target workspace(s) to share the selected content.
Uncheck one or more target workspace(s) to stop sharing the selected content.
Shared documents are part of the target workspace list of documents with the symbol  .
.
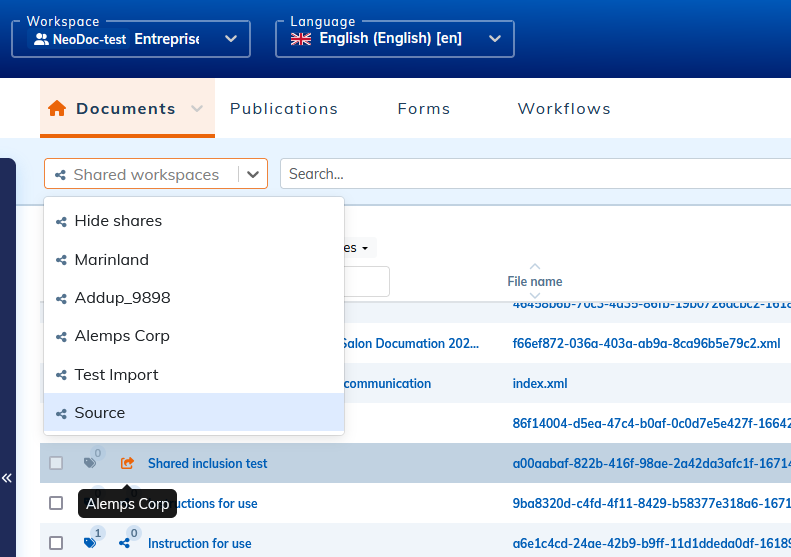
It is possible to sort native content from shared content by selecting Hide shares.
Check out the video Sharing content between workspaces: